During this week starting from
[day 1](/blog/using-openai-and-supabase-db-to-create-an-api) we covered a lot
about building an AI-based API with Supabase and Zuplo with the best practices
to ship an API in no time, and today we'll cover the best part: how to monetize
the API!
[Monetizing APIs](/learning-center/what-is-api-monetization) helps you make
money from the data (or, conveniently, the AI models) you have. When you offer
your APIs as products or services, your company can reach new customers, attract
more developers, and create self-sustaining communities around your products.
Today we're taking the SupaAPI that we built in the last 4 days and we'll add a
monetization layer to it.
## How are we monetizing the API?
For the tutorial, we will be adding 2 new components to the project:
- [Stripe](https://stripe.com): a service for monetization, product and
subscription management, and billing.
- Supa-API site: a simple web app where users can sign in and subscribe to the
API.
This is in addition to the existing:
- [Supabase](https://supabase.com): the database and auth for the client app and
the documentation
- [Zuplo](https://zuplo.com): the API Gateway to which your Supabase data is
exposed and secured
### The API billing model
The type of billing we have created for this tutorial follows a
_"Pay-as-you-go"_ model of 0.01$/request (you can be less generous), which
charges customers based only on the number of requests they've made, no more and
no less. This is a pretty flexible billing type that most APIs (like OpenAI's)
use and allows users to not pay much when their use is small, but then scale
their usage (and billing) of your API progressively over time.
The billing model is just an example though, and you can build any billing model
(monthly fixed number of requests or time-based rate limits to name a few),
following the same principles as this sample.
### Life of a request to the API
The life of a request coming to your API will be like the following diagram
below, where you can see that Zuplo reports to Stripe how many requests your
API's subscribers have made.
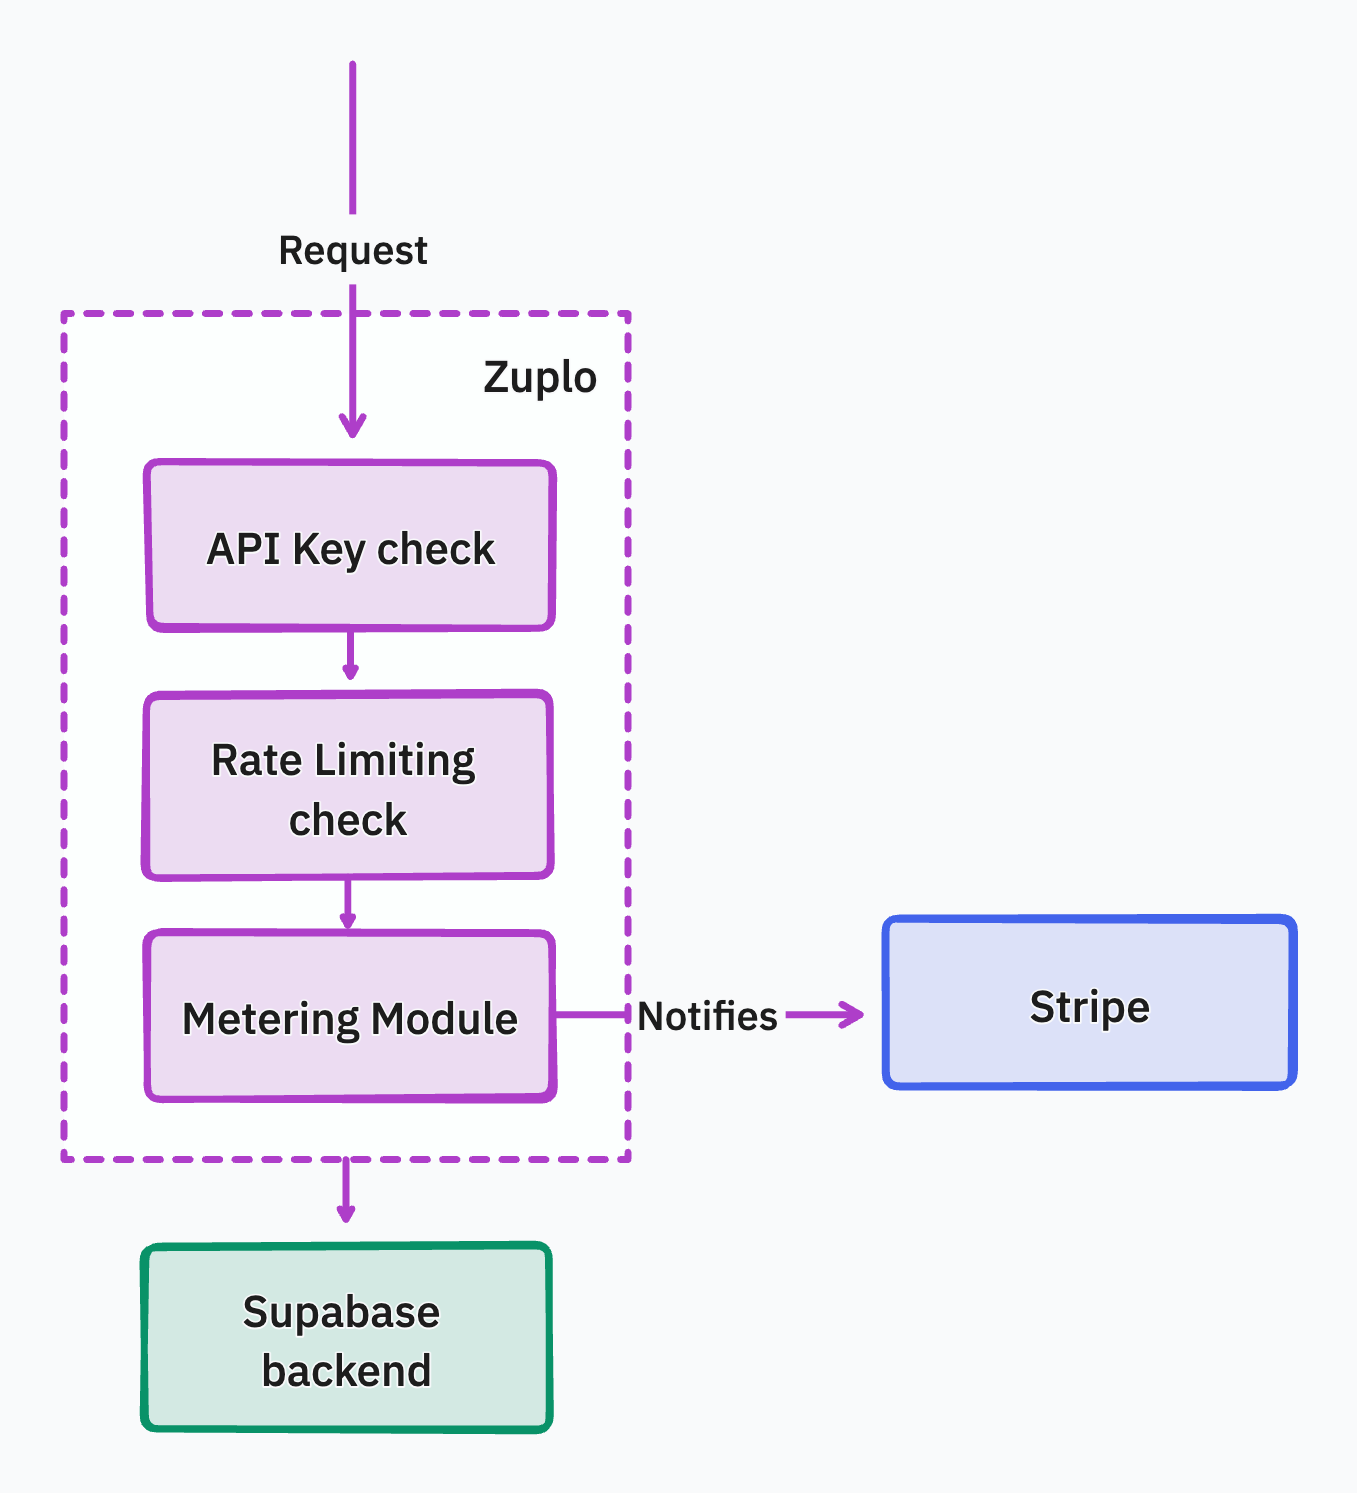
At the end of the billing period, Stripe will calculate the number of requests
the subscriber has made for the month and will send them an invoice with the
total amount.
## Monetizing your API
Follow the video walkthrough of this tutorial here:
### Step 1 - Create a Stripe account and product
**1. Create a Stripe account**
[Create a Stripe account](https://dashboard.stripe.com/register) to start
accepting payments.
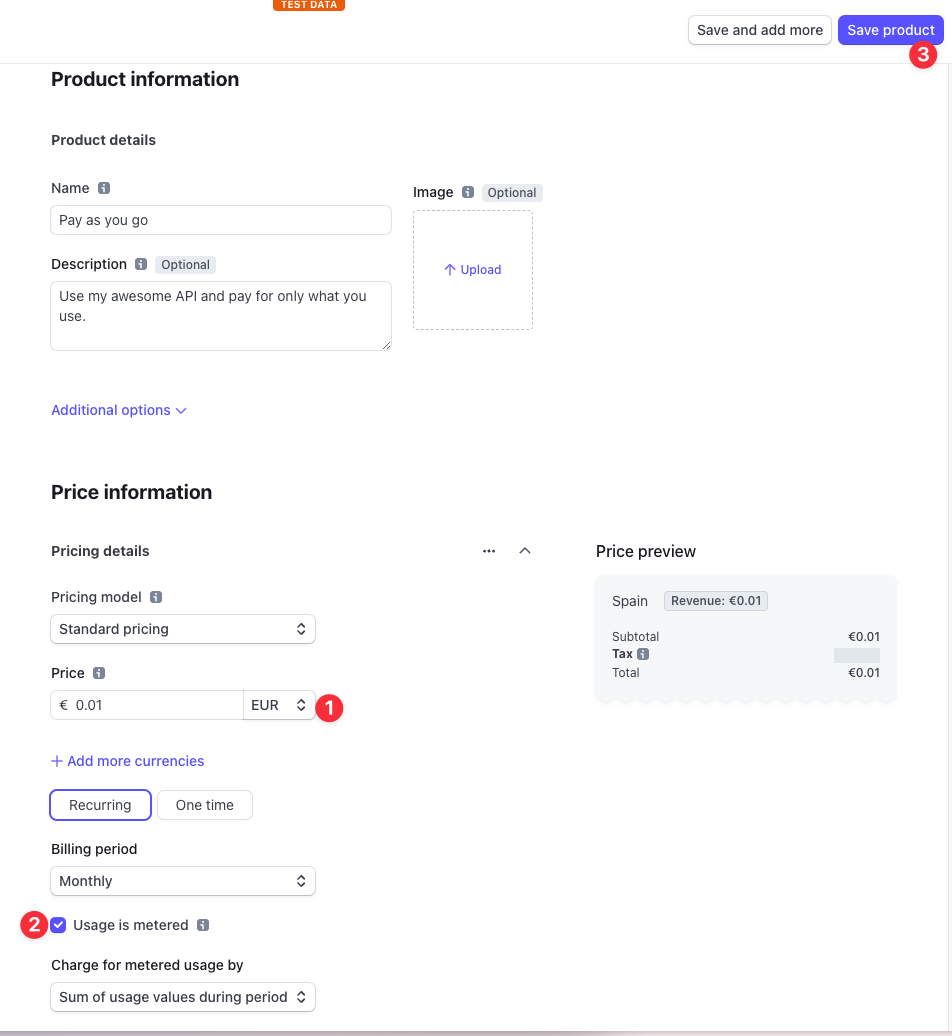
**2. Create a metered product in Stripe**
To enable metered billing so that you can charge users based on their API usage,
you'll need to create a metered product in Stripe.
Ensuring you are in Test mode (you'll see a toggle at the top right of the
console), go to **_Products_** and click **_Add a product_**.
Now create a product with the following details:
### Step 2 - Add the monetization module to Zuplo
To not have you copy-paste a lot of code this time, we'll clone a new project
that will contain the state of the API project we worked on in the previous days
and the new billing module using Stripe. Click on the button below to deploy it.
 {" "}
Remember to set the environment variables in **_Settings > Environment
Variables_** with the same values from your previous project:
1. `OPENAI_API_KEY`: Your OpenAPI API Key which you can get from the
[OpenAI account dashboard](https://platform.openai.com/account/api-keys).
1. `STRIPE_SECRET_KEY`: This key is your Stripe Secret Key. You can get this in
Stripe dashboard by clicking on Developers > API Keys. Again, be sure you're
in test mode.
1. `SUPABASE_URL`: in Supabase, go to the **_Settings > API_** tab and copy the
**_URL_**.
1. `SUPABASE_SERVICE_ROLE_KEY`: from the same page, copy the **_Service Role
Key_**.
**What's new in this project?**
If you check the policies that are applied to each request, you'll see that
there's a new policy called `custom-code-inbound` which uses a custom billing
policy which we created for today called **_metered-request_**.
If you open the file `metered-request.ts`, you can see that once it receives a
request, it checks if the API Key has the metadata `stripeCustomerId` added to
which we assume is part of the API Key metadata of a customer of your API (we'll
talk more about it in the next step).
After that, it'll request Stripe to see if the customer is still subscribed, it
might be that they decided to cancel their subscription but still have an active
billing period, so this check is important. But doing this check on every
request would add a lot of latency, that's why we use the
[Zuplo Cache](/docs/articles/zone-cache) to save the result of this request for
some time, so the following requests are handled much faster.
Once the check with Stripe is complete, the module adds the request to a batch
of requests that haven't been notified to Stripe yet, and every 250ms it will
notify Stripe and flush the batch; **this is needed so we don't hit Stripe's
rate limits of 100req/second**. All of this is done without blocking the
handling of the request, i.e. in the background - which is why we use
`context.waitUntil`, which makes the handling of the requests blazingly fast.
### Step 3 - Deploy the frontend client using Vercel
You will deploy and configure the web app with environment variables and the
Stripe subscription table, for that,
[deploy the web app](https://github.com/zuplo-samples/supa-api-site) using
Vercel.
👇🏽 Click here to deploy:
{" "}
Remember to set the environment variables in **_Settings > Environment
Variables_** with the same values from your previous project:
1. `OPENAI_API_KEY`: Your OpenAPI API Key which you can get from the
[OpenAI account dashboard](https://platform.openai.com/account/api-keys).
1. `STRIPE_SECRET_KEY`: This key is your Stripe Secret Key. You can get this in
Stripe dashboard by clicking on Developers > API Keys. Again, be sure you're
in test mode.
1. `SUPABASE_URL`: in Supabase, go to the **_Settings > API_** tab and copy the
**_URL_**.
1. `SUPABASE_SERVICE_ROLE_KEY`: from the same page, copy the **_Service Role
Key_**.
**What's new in this project?**
If you check the policies that are applied to each request, you'll see that
there's a new policy called `custom-code-inbound` which uses a custom billing
policy which we created for today called **_metered-request_**.
If you open the file `metered-request.ts`, you can see that once it receives a
request, it checks if the API Key has the metadata `stripeCustomerId` added to
which we assume is part of the API Key metadata of a customer of your API (we'll
talk more about it in the next step).
After that, it'll request Stripe to see if the customer is still subscribed, it
might be that they decided to cancel their subscription but still have an active
billing period, so this check is important. But doing this check on every
request would add a lot of latency, that's why we use the
[Zuplo Cache](/docs/articles/zone-cache) to save the result of this request for
some time, so the following requests are handled much faster.
Once the check with Stripe is complete, the module adds the request to a batch
of requests that haven't been notified to Stripe yet, and every 250ms it will
notify Stripe and flush the batch; **this is needed so we don't hit Stripe's
rate limits of 100req/second**. All of this is done without blocking the
handling of the request, i.e. in the background - which is why we use
`context.waitUntil`, which makes the handling of the requests blazingly fast.
### Step 3 - Deploy the frontend client using Vercel
You will deploy and configure the web app with environment variables and the
Stripe subscription table, for that,
[deploy the web app](https://github.com/zuplo-samples/supa-api-site) using
Vercel.
👇🏽 Click here to deploy:
 {" "}
1. `STRIPE_SECRET_KEY`: This key is the Stripe Secret Key that you got in
step 1.
1. `NEXT_PUBLIC_SUPABASE_URL`: in Supabase, go to the **_Settings > API_** tab
and copy the **_URL_**.
1. `NEXT_PUBLIC_SUPABASE_ANON_KEY`: from the same page, copy the **_anon key_**.
1. `NEXT_PUBLIC_ZUPLO_API_URL`: in Zuplo, go to the **_Settings > Project
Information_** tab and copy the **_URL_**.
1. `ZUPLO_BUCKET_URL`: from the same page, copy the **_API Key Bucket URL_**.
1. `ZUPLO_API_KEY`: in Zuplo, go to the **_Settings > Zuplo API Keys_** tab and
copy the available key.
Once deployed, take note of the deployment URL as you'll need it in the next
step.
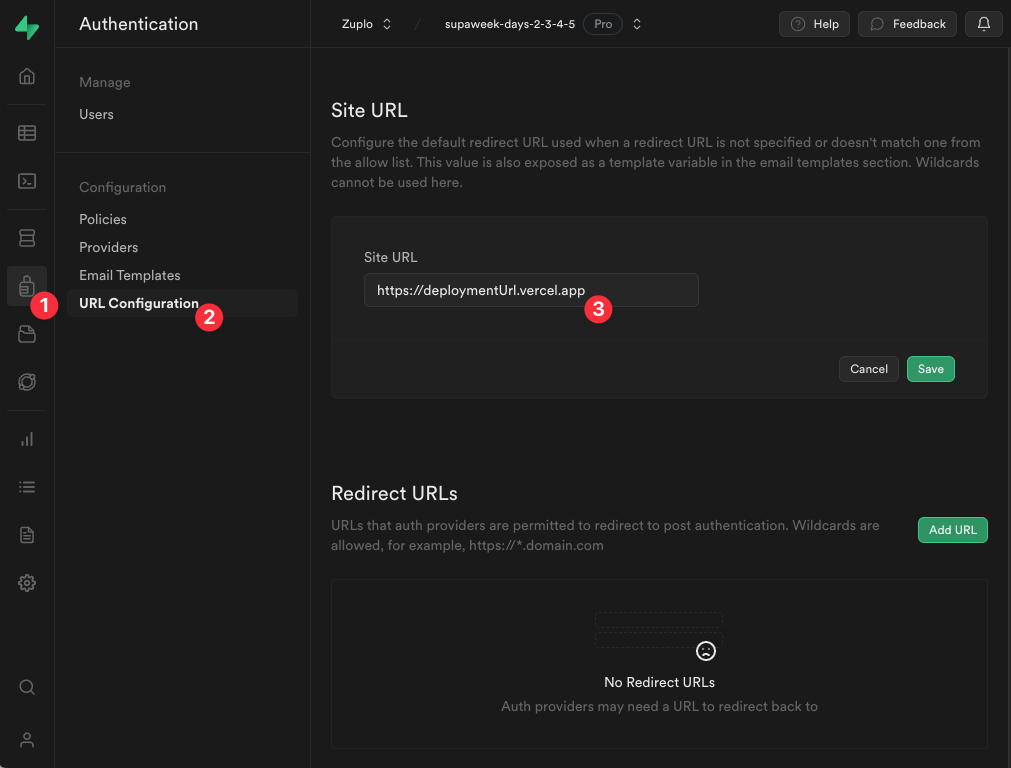
### Step 4 - Setup Auth in Supabase
Now that the frontend app is deployed, you'll need to configure Supabase Auth to
enable redirects to your web app when users sign up or sign in.
Go to **\_Authentication > URL Configuration** and add the URL of your Vercel
deployment to the **_Site URL_** field.
### Step 5 - Test the Web app by subscribing to your API
Copy the URL of your Vercel deployment and open it in your browser, sign up to
the website, which will then prompt you to subscribe to the API. This will take
you through Stripe's payment page to add your credit card details (for the demo,
you can use [Stripe's test cards](https://stripe.com/docs/testing#cards)).
Once you're done, you will automatically be redirected back to the website, and
an API Key Consumer will be
[created programmatically using the Zuplo API](https://github.com/zuplo-samples/supaweek-site/blob/main/app/zuplo.ts#L31-L74).
This will also add the `stripeCustomerId` to the metadata of the API Key
Consumer, which will be used by the billing module from the previous step.
You will then use your API's Developer Portal to login with your account and use
your API Key to make authenticated requests to the API.
That quick!
## Day 4 is over
What are you waiting for? Start now the cash machine 💸
Share with us your money-making story, questions, comments or feedback, by
joining us in our [Discord](https://discord.zuplo.com) server, or dropping us a
tweet at [https://twitter.com/zuplo](https://x.com/zuplo). We'd love to hear
from you!
[Day 5](/blog/announcing-supabase-auth-for-dev-portal) is out already, check it
out to learn about our new Supabase Auth announcement!
{" "}
1. `STRIPE_SECRET_KEY`: This key is the Stripe Secret Key that you got in
step 1.
1. `NEXT_PUBLIC_SUPABASE_URL`: in Supabase, go to the **_Settings > API_** tab
and copy the **_URL_**.
1. `NEXT_PUBLIC_SUPABASE_ANON_KEY`: from the same page, copy the **_anon key_**.
1. `NEXT_PUBLIC_ZUPLO_API_URL`: in Zuplo, go to the **_Settings > Project
Information_** tab and copy the **_URL_**.
1. `ZUPLO_BUCKET_URL`: from the same page, copy the **_API Key Bucket URL_**.
1. `ZUPLO_API_KEY`: in Zuplo, go to the **_Settings > Zuplo API Keys_** tab and
copy the available key.
Once deployed, take note of the deployment URL as you'll need it in the next
step.
### Step 4 - Setup Auth in Supabase
Now that the frontend app is deployed, you'll need to configure Supabase Auth to
enable redirects to your web app when users sign up or sign in.
Go to **\_Authentication > URL Configuration** and add the URL of your Vercel
deployment to the **_Site URL_** field.

### Step 5 - Test the Web app by subscribing to your API
Copy the URL of your Vercel deployment and open it in your browser, sign up to
the website, which will then prompt you to subscribe to the API. This will take
you through Stripe's payment page to add your credit card details (for the demo,
you can use [Stripe's test cards](https://stripe.com/docs/testing#cards)).
Once you're done, you will automatically be redirected back to the website, and
an API Key Consumer will be
[created programmatically using the Zuplo API](https://github.com/zuplo-samples/supaweek-site/blob/main/app/zuplo.ts#L31-L74).
This will also add the `stripeCustomerId` to the metadata of the API Key
Consumer, which will be used by the billing module from the previous step.
You will then use your API's Developer Portal to login with your account and use
your API Key to make authenticated requests to the API.
That quick!
## Day 4 is over
What are you waiting for? Start now the cash machine 💸
Share with us your money-making story, questions, comments or feedback, by
joining us in our [Discord](https://discord.zuplo.com) server, or dropping us a
tweet at [https://twitter.com/zuplo](https://x.com/zuplo). We'd love to hear
from you!
[Day 5](/blog/announcing-supabase-auth-for-dev-portal) is out already, check it
out to learn about our new Supabase Auth announcement!