When building an API in NodeJS, one of the common tasks is “how to secure the API?”.
Rate limiting is a common solution for securing APIs. But, you might wonder…
What is API rate limiting and why you need it?
It means controlling the amount of API calls your backend service gets in a specific period of time.
The reasons why you want to do this can be varied:
- Avoiding backend overload: this is important if you have limits on scaling or want to avoid high cloud costs.
- Protecting against threats: sometimes bad actors may attempt to overwhelm your services with excessive requests to disrupt your operations.
- Protecting against yourself: most of the time, it’s a loop in your code that ends up overwhelming your servers.
How to add rate limits to an API?
Multiple ways of doing this exist. You can add rate limiting directly to your API or use an API Gateway rate limiting service to achieve it.
Choosing either way has its benefits and its drawbacks. In the following sections we explore both options.
Adding your own rate limiting
In some scenarios, you might need to build your own rate limiting. But if you do this, make sure to understand the tradeoffs.
Multiple rate limiting algorithms exist (leaky bucket algorithm, fixed window algorithm, fixed rate, etc) and are available, to choose the type of rate limiting the depends on your use case.
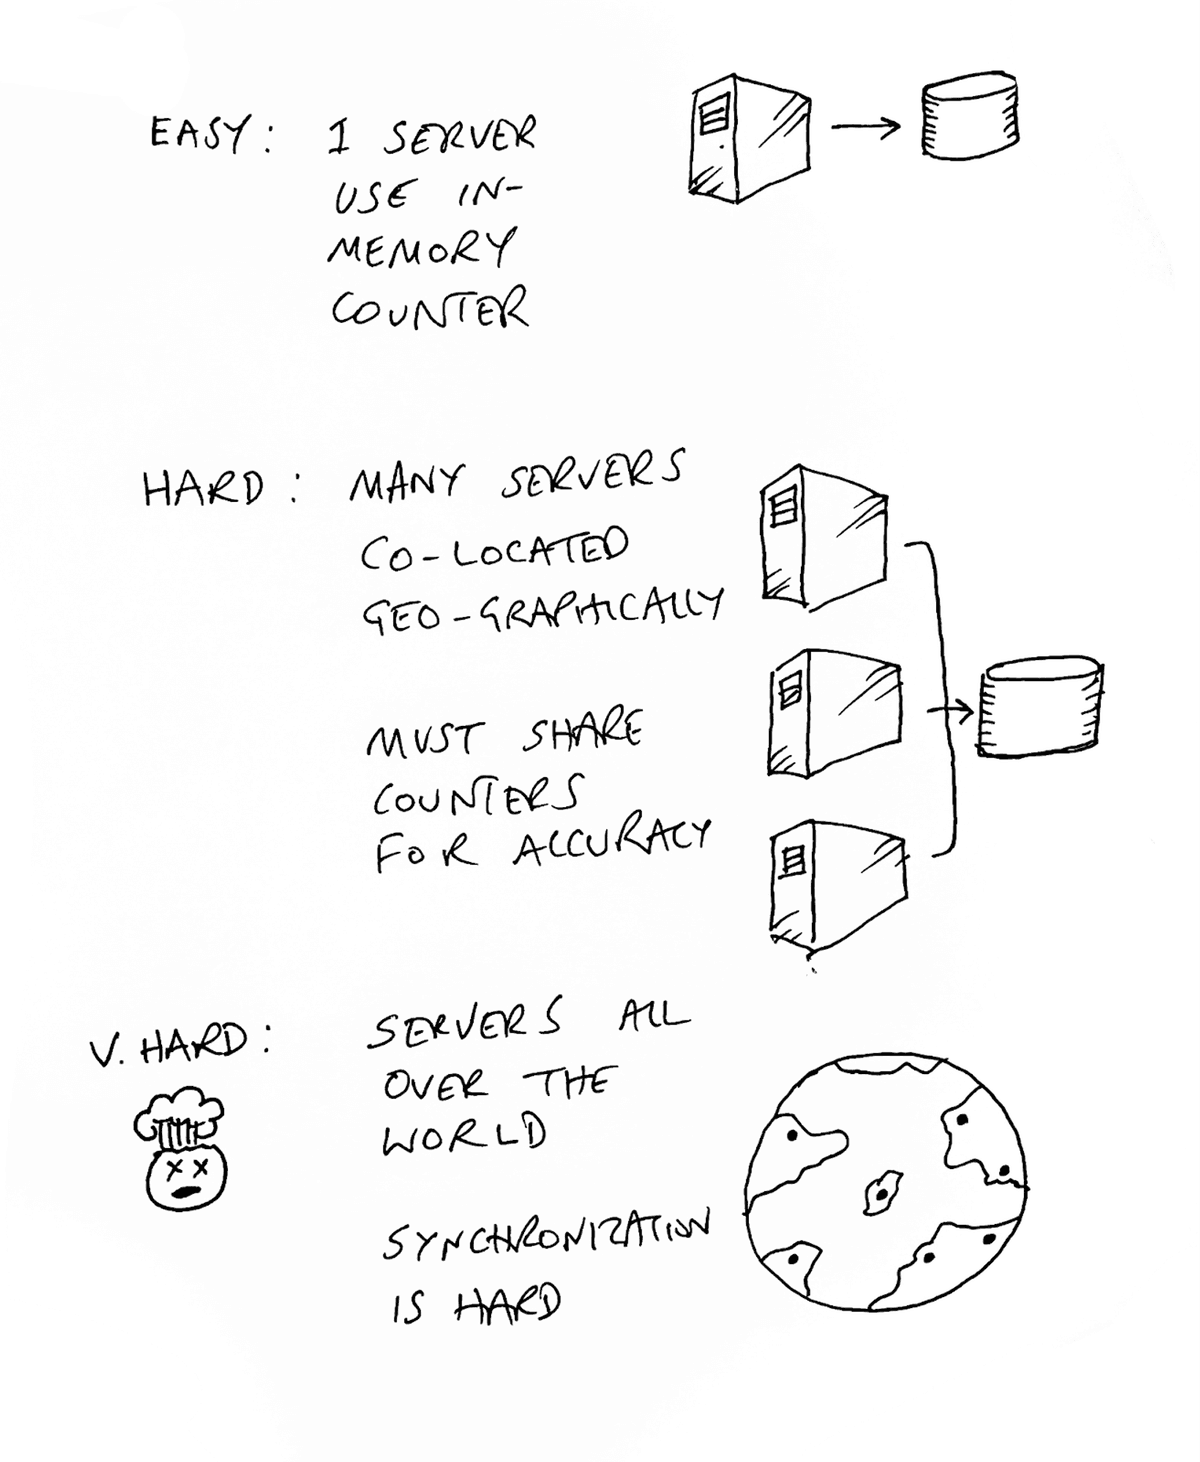
Additionally, practical reasons such as your architecture design (micro-services vs monolithic) or having a distributed system will also play a role on your decision to make your rate limiting work the way you want.
Some of the common fallbacks are:
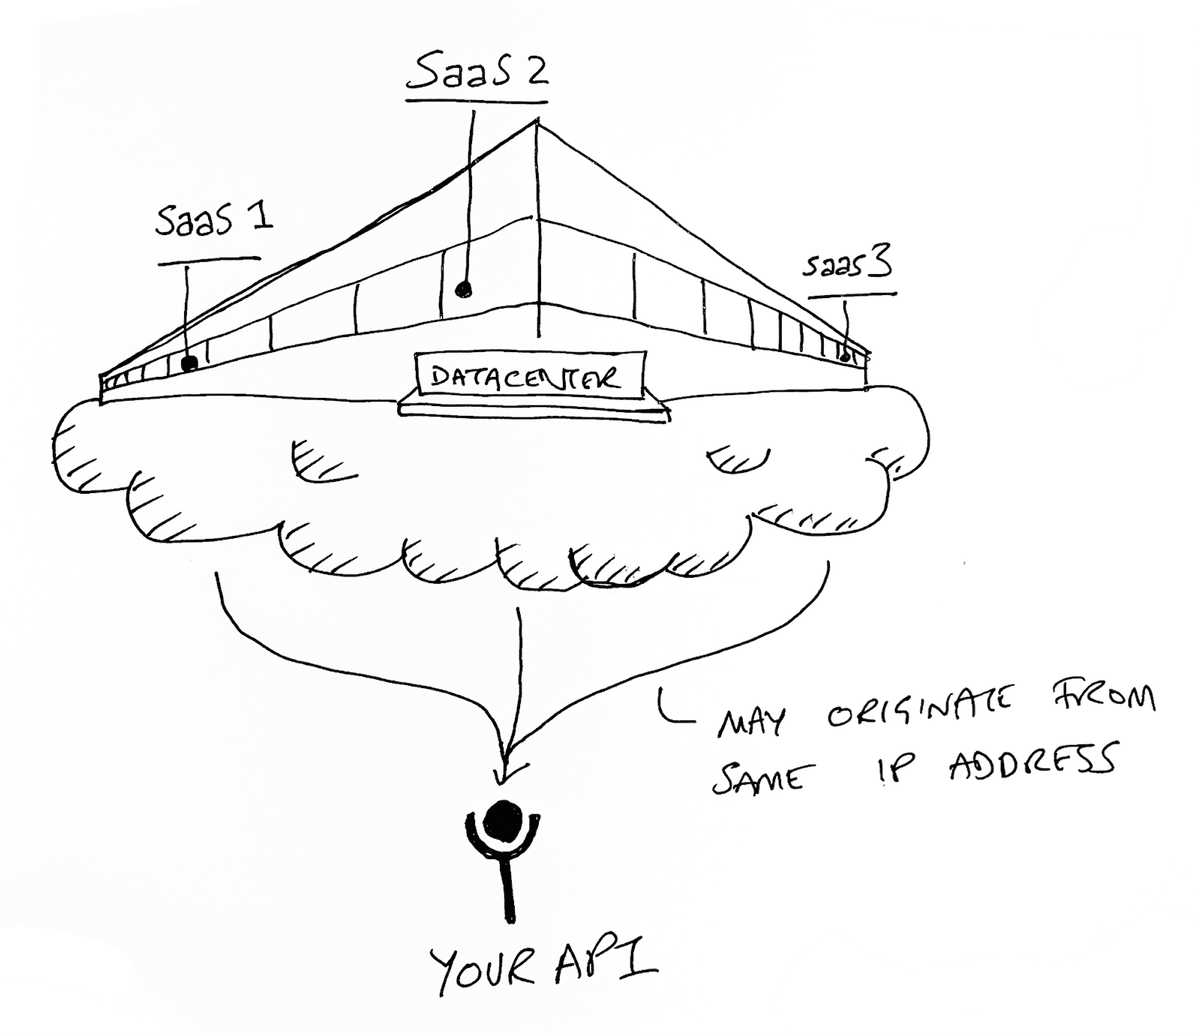
- Using IP-based rate limiting: this is rate limiting based on counting the number of request that come from an IP address. This method doesn’t work well because requests from users with the same IP address can cause some users getting wrongly rate limited. This is usually solved using API Key based rate limits.
- Rate limiting in your application backend happens if you use NodeJS’
express-rate-limitpackage directly with your app or web server. This is not good because the rate limiter should protect your backend from crashing. If it’s in your backend, it’s not helpful because if your backend crashes, the rate limiter also crashes. - Single rate limiter for global applications: if your backend is in multiple regions, your single rate limiting instance can become the bottleneck of your latency because requests have to all go through your single region rate limiter.
In the next section we’ll implement a typical solution for rate limiting APIs in NodeJs, but if you would rather not build your own rate limiting solution because you don’t want to spend time figuring out the tradeoffs, you can use Zuplo’s rate limiting solution directly for your APIs: https://zuplo.com/features/rate-limiting
How to rate limit APIs in NodeJS?
If you understand the tradeoffs and are ready to implement a rate limiting
solution, there are a few different approaches you can take. One option is to
use a library like express-rate-limit, a rate limiting middleware used for
most NodeJS APIs rate limits.
Step 1: Install the express-rate-limit library using npm.
To install the express-rate-limit library using npm, open your terminal and
navigate to your project directory. Then, run the following command:
This will download and install the library in your project. Once the installation is complete, you can start implementing the rate limit for NodeJS.
Step 2: Import the express-rate-limit module into your application by adding
the following line at the top of your JavaScript file:
Step 3: Define the rate limiting options.
You can customize the rate limiting behavior by specifying various options. You have the option to select the number of requests allowed per minute. Moreover, you can choose the message that will appear when the limit is reached (the good ’ol 429 Too Many Requests).
Lastly, you can also specify the HTTP status code that the system will send back. Here’s an example of how you can define the options:
Step 4: Apply the rate limiter to the desired routes in your application.
You can do this by adding the limiter middleware to the route handlers which
enforces rate limiting. For example:
In this example, the rate limiter will be applied to the /api/users route,
limiting the number of requests to 100 per minute.
Step 5: Start your NodeJS server and test the rate limiting functionality.
You can send multiple requests to the rate-limited route and observe how the library handles the rate limiting. If there are too many requests, the library will automatically reply with the set message and status code.
By following these steps, you can easily implement NodeJS rate limiter.
Conclusion
Implementing your own rate limiting solution in NodeJS can be challenging, as it is much more difficult than using a library implementation, given all the considerations you need to make.
At Zuplo, we have thought long and hard about rate limiting so you don’t have to. Try our rate limiting solution in one click by signing up at https://portal.zuplo.com