Supabase backends are often publicly accessible — anyone can sign up, create an account, and start making requests. That openness is great for developer experience, but it creates a real risk: a single user (malicious or simply careless) can overwhelm your service with excessive requests, starving other users of resources and driving up your infrastructure costs.
The answer is per-user rate limiting — enforcing a maximum number of requests per authenticated user over a given time window. Unlike IP-based limits, which can block legitimate users behind shared networks, per-user limits tie directly to the caller’s identity. For Supabase apps, that identity comes from the JWT token issued at sign-in.
With Zuplo, you can add identity-aware rate limiting to any Supabase backend in a few minutes, without changing your backend code. The only change on the client side is updating the Supabase URL to point to your Zuplo gateway.
Why Per-User Rate Limits Matter for Supabase
Supabase provides built-in rate limiting, but those limits are primarily IP-based on authentication endpoints — they don’t tie to the identity of an authenticated user. Without per-user controls, a single bad actor can consume your resources from multiple IPs, and legitimate users behind a shared network can be unfairly blocked.
Per-user rate limits solve this by giving each authenticated user their own independent request budget. This approach:
- Prevents resource starvation — one heavy user can’t degrade the experience for everyone else
- Protects your costs — Supabase charges based on usage, so runaway requests directly impact your bill
- Enables fair usage policies — you can set different limits for different user tiers or plans
- Reduces abuse surface — automated scripts and bots that authenticate as a single user get throttled before they cause damage
How Supabase JWT Auth Maps to Rate-Limit Keys
Supabase issues a JWT (JSON Web Token) when a user signs in. That token contains
a sub claim — the unique user ID — along with other claims like role,
user_metadata, and app_metadata.
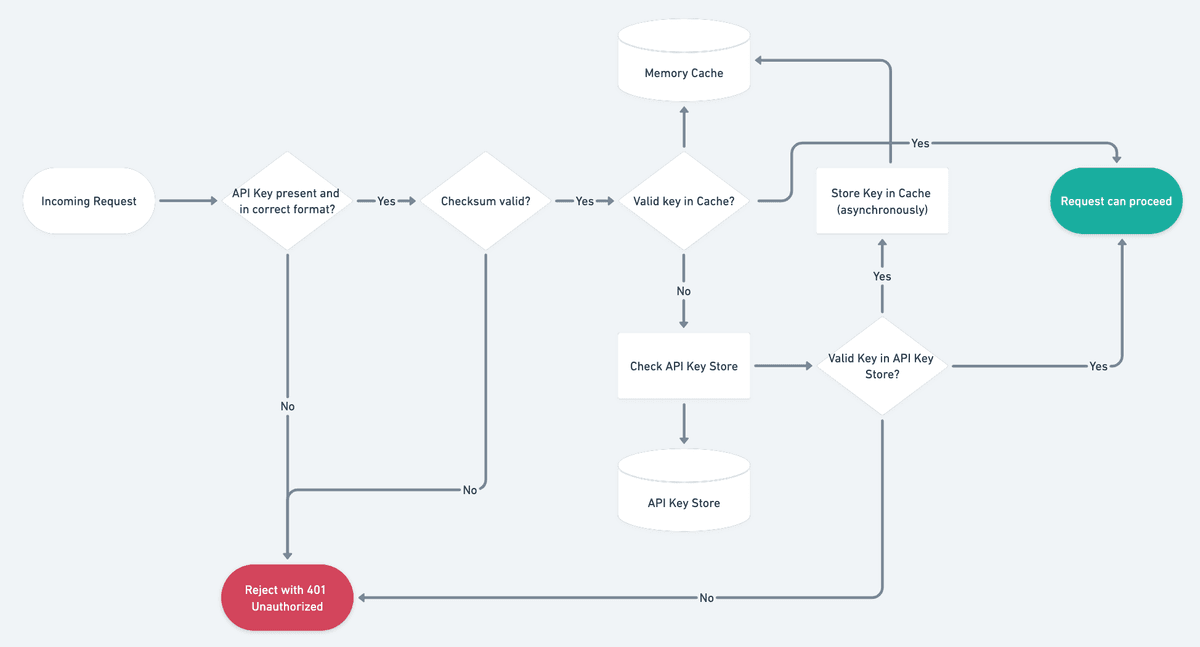
When you place Zuplo in front of your Supabase backend, the
Supabase JWT Auth policy validates
every incoming token and populates request.user on the ZuploRequest object.
Specifically:
request.user.subis set to the JWT’ssubclaim (the Supabase user ID)request.user.datacontains the remaining token claims, includinguser_metadataandapp_metadata
When the Rate Limiting policy is configured
with "rateLimitBy": "user", it reads request.user.sub and uses that value as
the bucket key. Each unique user ID gets its own counter, so two different users
never share a rate-limit bucket.
This is why policy ordering matters: the Supabase JWT auth policy must run
before the rate-limit policy in the request pipeline so that request.user is
already populated when the rate limiter checks it.
Configuring Per-User Rate Limits Step by Step
There is a video walkthrough of this guide if you prefer to follow along visually:

Step 1: Create a Zuplo Project
Sign up for a free account at portal.zuplo.com and create a new project.
Step 2: Add a Wildcard Route
Add a route to your project with the following properties:
- Path:
/(.*)— a wildcard pattern that matches all incoming paths - Methods:
all— select every HTTP method in the dropdown - CORS:
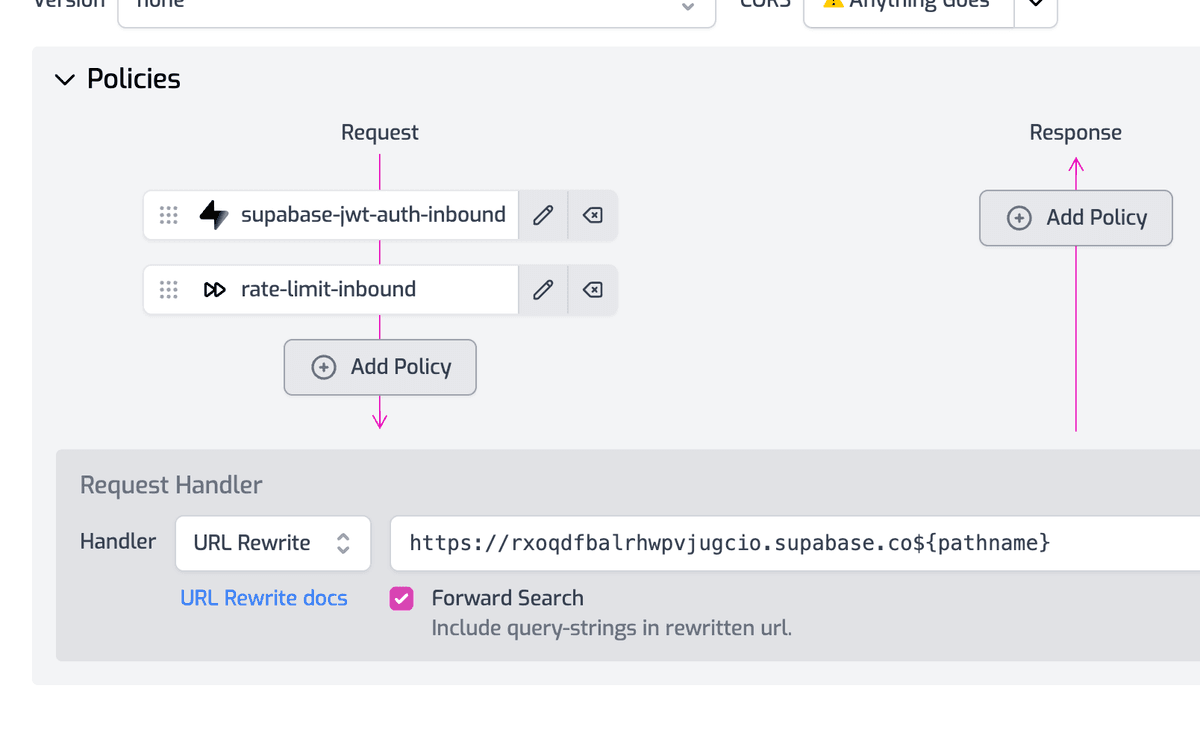
anything goes— the simplest option for getting started (you can configure a stricter CORS policy later) - URL Rewrite:
https://your-supabase-project.supabase.co${pathname}— replace the domain with your actual Supabase project URL
This route proxies every request through Zuplo to your Supabase backend, preserving the original path.
Step 3: Add the Supabase JWT Auth Policy
Add a policy to the request pipeline and choose the supabase-jwt-auth
policy. Configure it to verify tokens using your Supabase JWT secret:
With allowUnauthenticatedRequests set to false, any request without a valid
Supabase JWT automatically receives a 401 Unauthorized response.
Step 4: Set the JWT Secret Environment Variable
Navigate to Settings > Environment Variables in the Zuplo portal and create
a new variable called SUPABASE_JWT_SECRET. Paste in the JWT secret from your
Supabase project (found under Settings > API in the Supabase dashboard).
This secret is stored securely and never exposed in your route configuration.
Step 5: Add the Rate-Limiting Policy
Add a second policy after the Supabase JWT auth policy in the request
pipeline. Choose the rate-limit-inbound policy and configure it for per-user
limiting:
This configuration allows each authenticated user up to 100 requests per minute.
Adjust requestsAllowed and timeWindowMinutes to match your application’s
needs. When a user exceeds the limit, they receive a 429 Too Many Requests
response with a Retry-After header indicating when they can try again.
Step 6: Update Your Client
Go to the Getting Started tab in the Zuplo portal and copy your gateway URL. Replace the Supabase URL in your client application with this gateway URL.
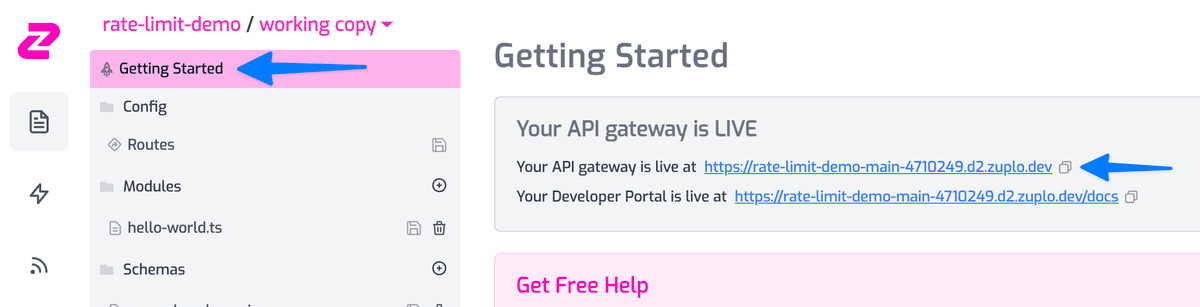
That’s it — all traffic now flows through Zuplo, where it’s authenticated and rate-limited on a per-user basis before being forwarded to Supabase.
Testing Your Per-User Rate Limits
After deploying, verify that rate limiting works correctly:
- Authenticate as a test user and send requests at your normal rate —
requests should succeed with
200responses. - Exceed the limit by sending more than
requestsAllowedrequests within the time window. You should receive a429 Too Many Requestsresponse. - Authenticate as a different user and confirm that their requests still succeed — each user has an independent counter.
- Check the response headers for
Retry-After, which tells the client how long to wait before retrying.
If you set a low limit (like 2 requests per minute) for testing, you can quickly
verify the behavior with a tool like curl or Postman.
Common Pitfalls
- Policy ordering — if the rate-limit policy runs before the JWT auth
policy,
request.userwon’t be set and the rate limiter can’t identify the caller. Always place authentication first in the pipeline. - Missing environment variable — if
SUPABASE_JWT_SECRETisn’t set or contains the wrong value, every request will fail authentication with a401. Double-check the value in your Supabase dashboard under Settings > API. - Anonymous access — with
allowUnauthenticatedRequests: false, unauthenticated requests are blocked before they reach the rate limiter. If you need to allow some anonymous endpoints, consider using separate routes with different policy configurations. - Overly strict limits — start with generous limits and tighten them based on real usage data. Blocking legitimate users is worse than allowing a few extra requests.
Next Steps
With per-user rate limiting in place, you’ve added a critical layer of protection to your Supabase backend. From here, you can explore:
- Dynamic rate limiting to adjust limits based on external data sources
- Shipping a public API backed by Supabase with authentication, documentation, and a developer portal
- 10 best practices for API rate limiting to refine your rate-limiting strategy
- Supabase JWT authorization to enforce claims-based access control alongside rate limits
Ready to protect your Supabase API? Get started with Zuplo for free.