Building on the CRUD APIs we created in the first tutorial, this guide provides step-by-step instructions on adding API key authentication and authorization to a Firestore API using Zuplo. This setup ensures secure communications for your API, similar to how companies like Stripe and GitHub handle API security.
By the end of this guide, we will have secured our APIs so that users can only view, update, and delete items they have created. We will do this using Zuplo’s built-in API key functionalities.
Before we get started, you’ll need to have the following prerequisites checked off:
- A Firestore database.
- Basic knowledge of CRUD operations with Firestore.
- Zuplo account setup.
To fully follow along, you’ll also want to ensure you’ve implemented everything we tackled in part 1 of this series, which is available here.

Step 1: Add The API Key Authentication Policy to Your Routes
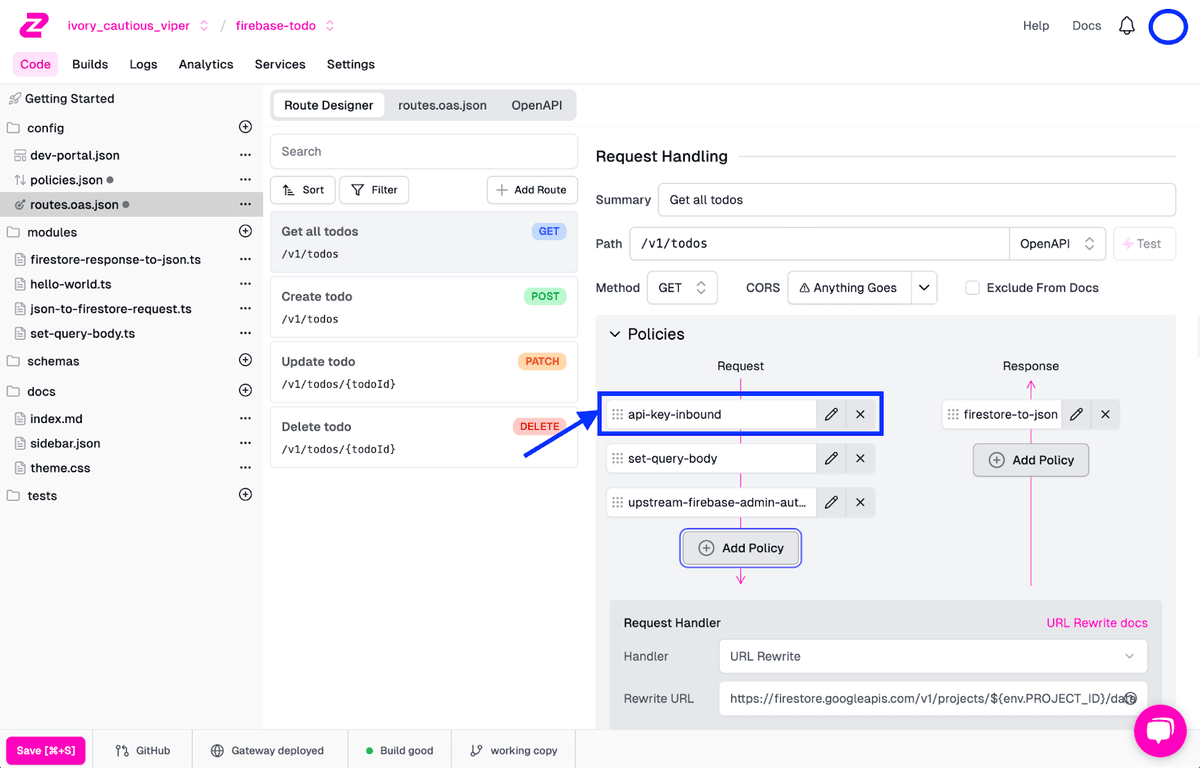
Once you’ve logged into your Zuplo instance and have navigated to the project containing the CRUD APIs we created in the previous tutorial, we will add an API Key Inbound policy to our APIs. To do this, we will:
- Within your project in Zuplo, go to the Code tab and select routes.oas.json from the left-side menu.
- Select the GET endpoint, named “Get all todos”.
- Under the Policies section for the endpoint, click Add Policy under Request.
- In the Choose Policy modal that appears, select the API Key Authentication entry.
- Keeping the default Configuration, click OK to add the inbound policy to the request pipeline.
- With the policy in the request pipeline, drag it to the top of the request pipeline policy list.
- Save the updated endpoint configuration by clicking Save in the bottom-left corner.
Once selected and applied, this is how your endpoint should look:
Add Auth To The Other Routes
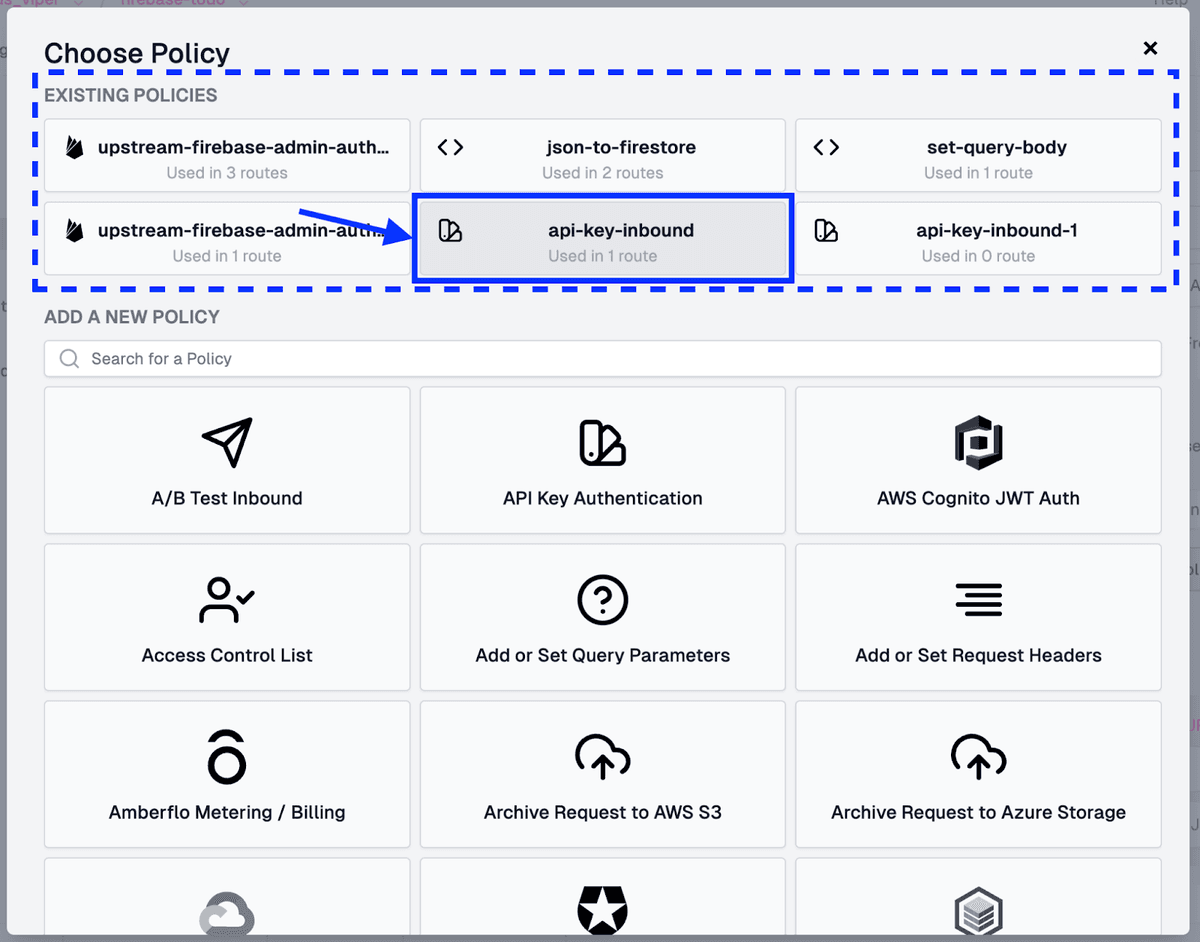
At this point, we’ve added API key authentication to our GET route, but we need to roll it out to the other three routes we previously created. Repeat the steps above for the POST, PATCH, and DELETE routes to do this.
When selecting and applying the Policy on the other routes, choose the api-key-inbound policy under Existing Policies, clicking See All if the entry is hidden at first.
Test Endpoints For API Key Enforcement
Once the API key authentication has been added to all routes, let’s quickly test the GET endpoint to ensure our newly added API key authorization works. For this, we will:
- Navigate to the GET endpoint from routes.oas.ts.
- Click Test beside the APIs Path field** to bring up the Test Your API** modal.
- In the modal, click the Test button to send the request.
Once the request is sent, the response should show a 401 Unauthorized being returned.
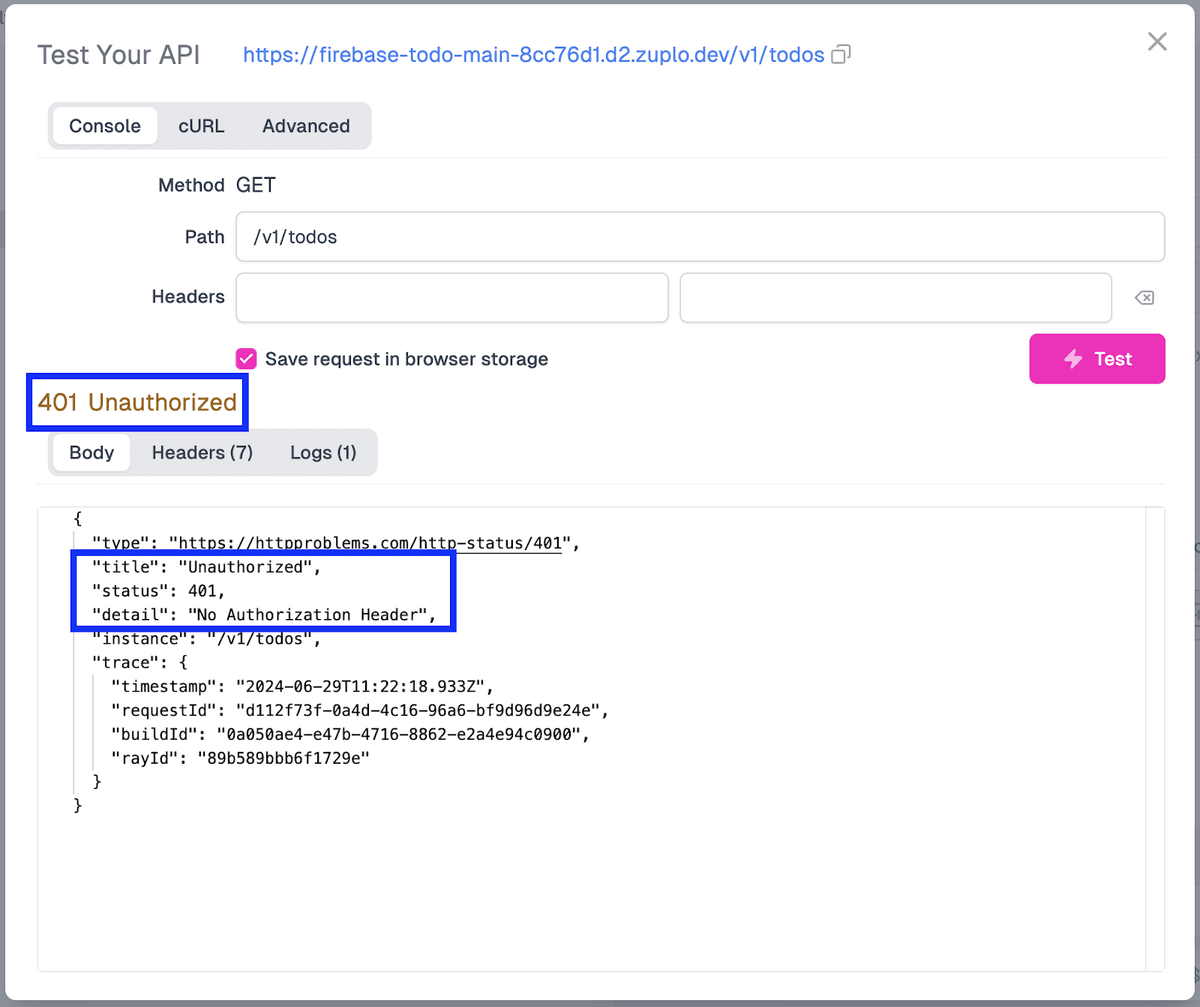
This error is returned because a valid API key is not attached to our request, which is expected to be passed via an Authorization header. In this particular case, no API key is attached at all. Before we begin creating API keys, let’s ensure that users can only access and change Todo entries that belong to them. This will require some changes in our queries to Firebase, which we will tackle next.
Step 2: Modify The Firestore Queries
To make it so that API users only have access to their Todo entries, we will need to change the set-query-body policy that we created in the previous tutorial. We will need to do the following steps to apply the necessary changes:
-
In Zuplo, under the Modules folder in the left-side menu, select the set-query-body.ts file.
-
Once opened in the editor, we will add a where clause to our Firebase query. The snippet we will add at the bottom of the structuredQuery object will look like this:
jsonThis code will ensure that the userId field (which we will add later) in the Todo entry matches the API keys’ request.user.sub field. Of course, you could also pull this value out of the key’s metadata fields, but we will use the sub field for this demo for ease.
Overall, the code within the set-query-body.ts file, including the most recent where clause addition, should look like this:
typescript -
With the file updated, click Save in the bottom-left corner to save and deploy the updated configuration to the gateway.
Now, with our logic implemented, we need to move forward with creating an API key for an API consumer so that we can once again use the API.
Step 3: Create An API Key Consumer
We can use the Zuplo UI or API to create an API key. For demonstration purposes, we will use the UI, but you can reference our API docs if you are interested in hooking this up via API.
To create an API key in the UI, do the following:
- In the header menu in Zuplo, click on Settings.
- On the Settings screen, select API Key Consumers from the left-side menu.
- On the API Key Service screen that appears, click Create Consumer.
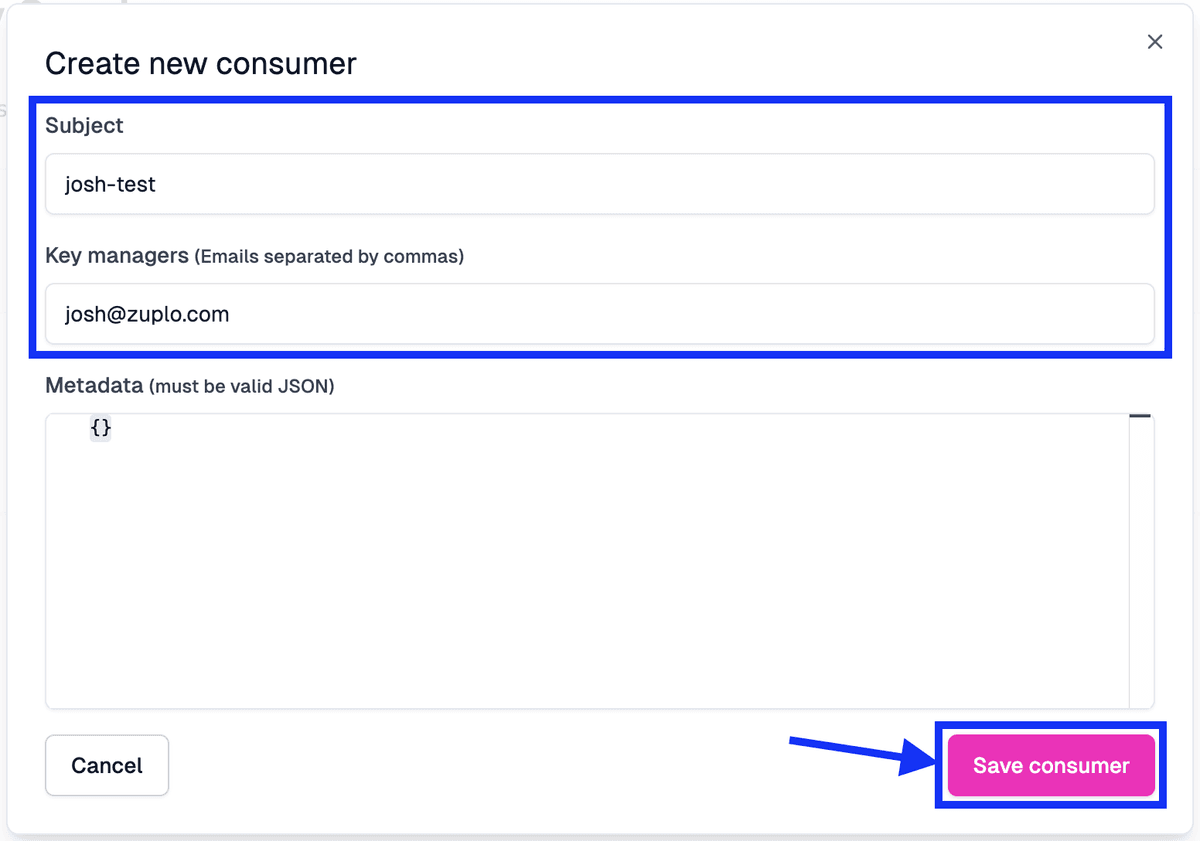
- On the Create new consumer modal, populate the fields as follows:
- In the Subject field, we will add “yourname-test”.
- Under Key managers, add your email to the field (and any other users that you want to give access to manage the key).
- We will leave the Metadata field blank for this tutorial; however, you can add any details you’d like in JSON format.
- Click Save consumer to create the API key.
Once the consumer is created, their entry, including their API key, will appear in the Consumers list on the API Key Service screen.

With the API key created, click the Copy button to add the key to your clipboard.
Test A Request With An API Key Attached
Let’s test the GET API again with an Authorization header attached to the request. To test it out, do the following:
- In the header menu, click Code and navigate back to the routes.oas.json screen
- Select the GET endpoint.
- Click on Test.
- In the Test Your API modal, under Headers, add the following values:
- In the first field, the headers Key field, add in “Authorization”.
- In the second field, the headers Value field, add in “Bearer “ + your API key that was copied on the previous screen.
- Click Test.
You should see a 200 OK response returned from the API call.
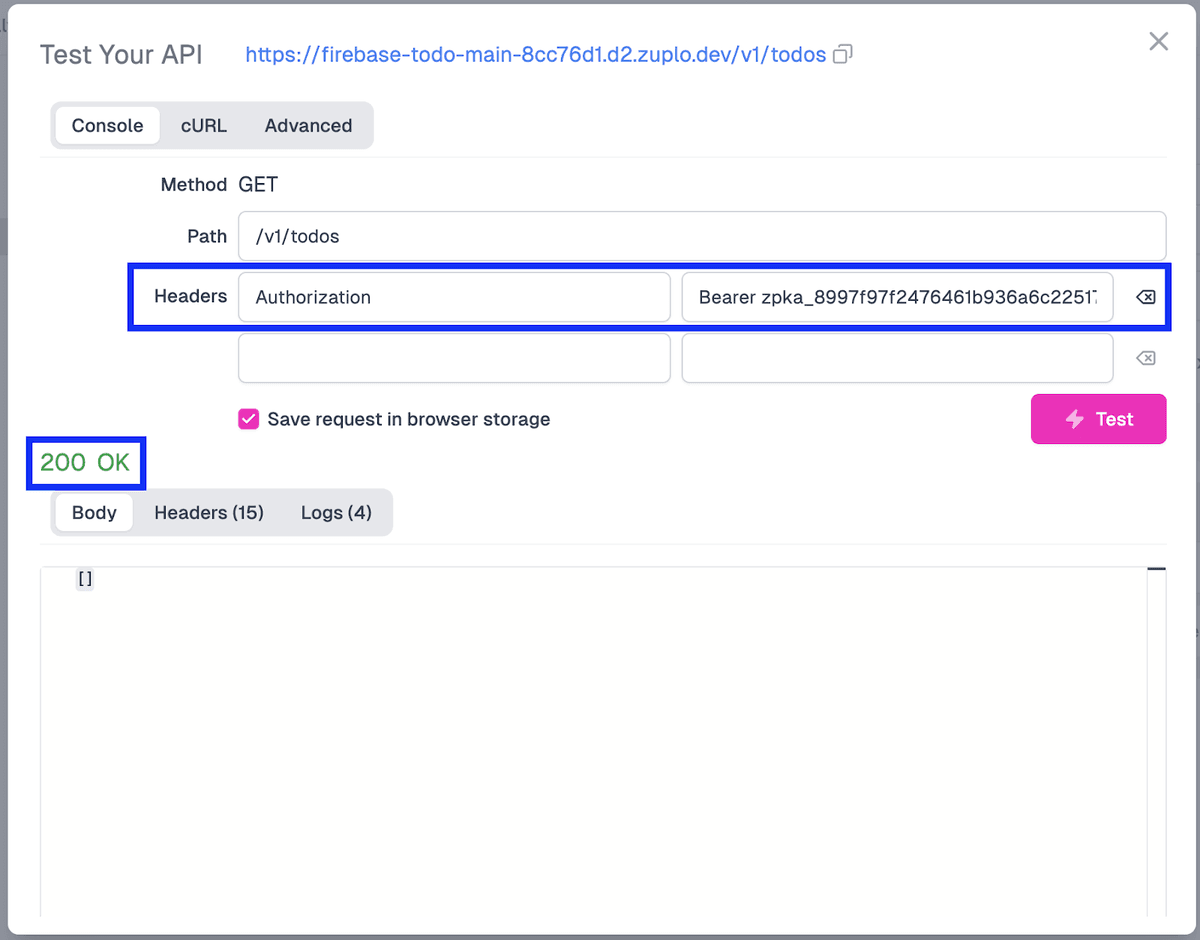
This will validate that our API key auth is working as anticipated. However, you’ll notice that the response body is empty, which makes sense since our query now contains a WHERE clause. For results to come back to us for an actual Todo item, we need to add a userId field to the to-do entry to filter it correctly. Let’s do that next!
Step 4: Add A User ID To The Todo Item
For our setup to work correctly, when a Todo item is created, we also want to add the UserId of the user creating it. The easiest way for us to do this is to create a new inbound policy that will do exactly this. This policy will take the user’s ID from the API key and add it to the item when it is being created, making it impossible to create anonymous items in Firestore.
Create The set-user-id Policy
To create the policy, let’s do the following:
-
In the left-side menu, beside the modules folder, click + and select Inbound Policy.
-
For the new files’ name, set it as “set-user-id”.
-
With the file opened, add the following code, removing and changing a few lines of code from the boilerplate configuration:
typescriptIn this code, we add the API key’s sub field to the requests’ data.userId field so it can be used within the request.
-
Click Save in the screen’s bottom-left to save the file and deploy to the gateway.
Add The Policy To A Route
Next, let’s add the policy to our route. For this, we will:
- Open routes.oas.json, and click on the Create todo [POST] endpoint.
- Under Policies, click the Add Policy button at the bottom of the Request pipeline.
- In the Choose Policy modal, select Custom Code Inbound under the Add a New Policy section (using the search input to find the entry if needed).
- In the Create Policy modal, set the following:
-
Set the Name field to “set-user-id”
-
Import the module we created previously by setting the Configuration to (removing the options object, as it is not needed):
jsonOnce the values are filled out, your modal should look like this:
-

- Click OK to create the policy.
- With the new policy added to the Request pipeline, drag it just above the entry for json-to-firestore.
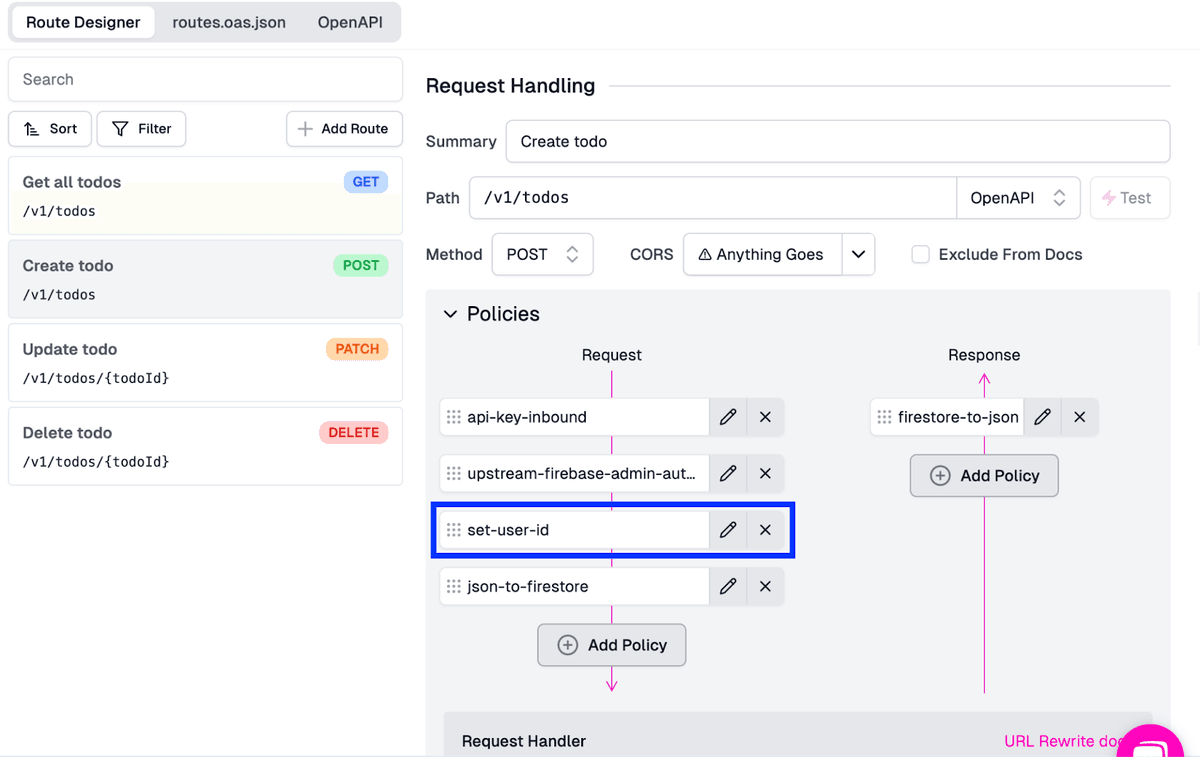
- Click Save in the bottom left corner to save the changes and deploy the updates to the gateway.
With our new policy created and added, it’s time to test our flow to ensure the endpoint works as expected. To do this, we will once again use Zuplo’s internal API testing capabilities.
Test The Policy
To test the POST endpoint, we will:
- In the routes.oas.json file, ensure you’re using the POST endpoint entry.
- Click on Test beside the Path input field
- In the Test Your API modal, with your Authorization header populated as we did in the previous test (“Bearer zpka_XXXX”) and data in the request Body field, click Test.
You should see that the request has worked and created a new entry with the userId that was extracted from the API key. A successful test result should look like this:
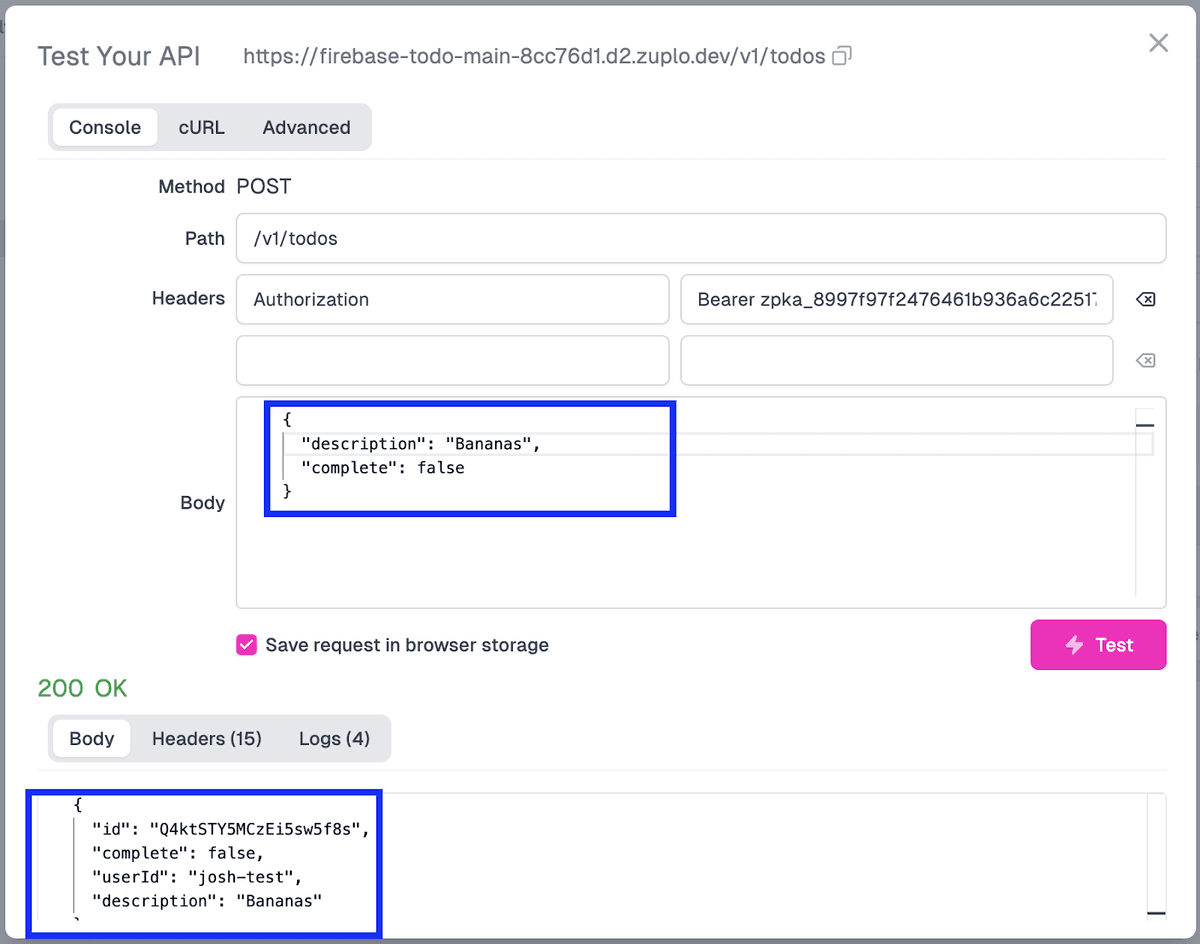
Based on this result, we can confirm that creating a new to-do item stamped with the user’s ID works as intended.
If we go back to our GET endpoint and run the query (ensuring that our Authorization header is set correctly with the API key we created), we should also see a similar result where Firestore returns all of the items that our particular user has created.
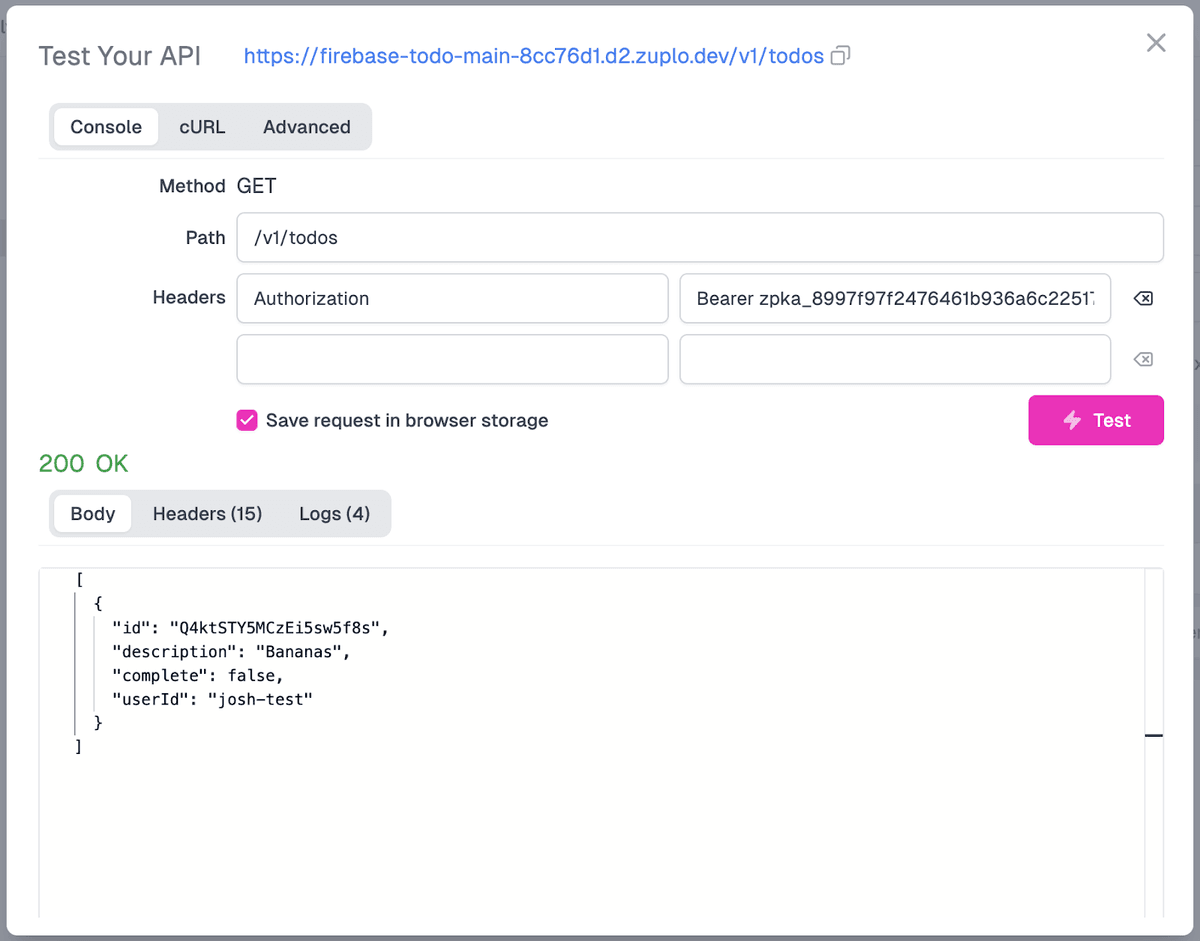
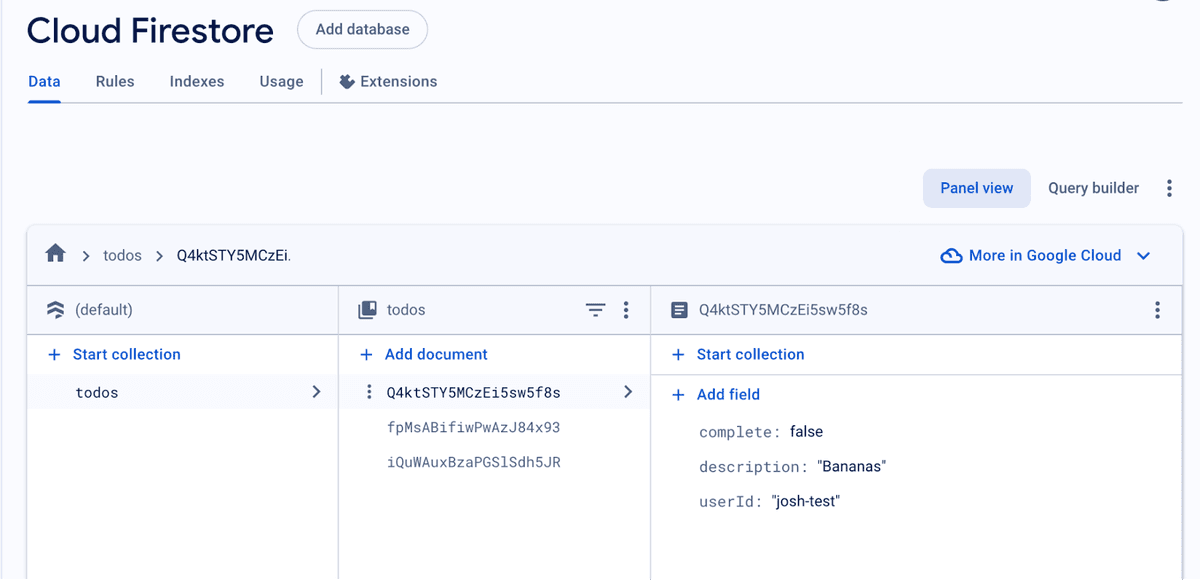
We can also confirm this in Firestore by going to the newly created item and ensuring the userId is in the collection with the correct value.
You’ll notice that the API only returns the items belonging to the user making the request, not all of the items that exist in the database. Next, we need to make it so that users can update and delete items that belong to them, enforcing access control so that they can only change items that belong to them.
Step 5: Add Access Control To Update and Delete Operations
We will create a Check Access policy so that users can only update and delete items that belong to them. This policy will confirm that the item belongs to the user before allowing it to be changed within Firestore.
Create The check-access Policy
To implement this, we will do the following:
-
In the left-side menu, click the + button beside modules.
-
Select Inbound Policy from the menu.
-
Name the new file “check-access-todo.ts”
-
In the file itself, add the following code:
typescriptAt a high level, in this code, we retrieve the to-do item the user is trying to access. We extract the item’s userId field and compare it to the user’s sub value in the request. If the two match, we allow the action to proceed, but if they don’t, we will return a 403 Forbidden.
-
With the code added to the policy, click Save in the bottom-left corner.
Add The Policy To The PATCH/DELETE Endpoints
Next, we must add the policy into the PATCH (Update todo) and DELETE (Delete todo) endpoint’s request pipeline. For this, we will do the following steps:
- Go to the routes.oas.json file and select the PATCH endpoint.
- Under Policies, click Add Policy under Request.
- In the Choose Policy modal, select the Custom Code Inbound option.
- In the Create Policy modal:
-
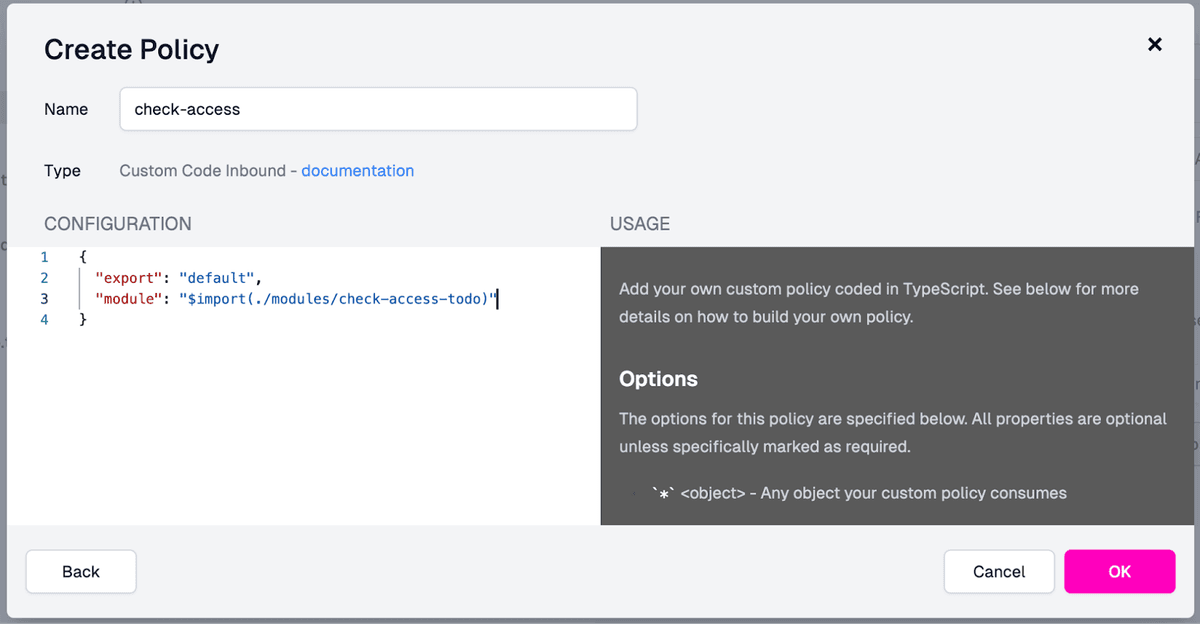
Set the name for the policy as “check-access”.
-
Add the following value to the Configuration field, deleting the options values since they are not needed:
jsonThe populated modal will look like this:
-
- With the policy fields filled out in the modal, click OK.
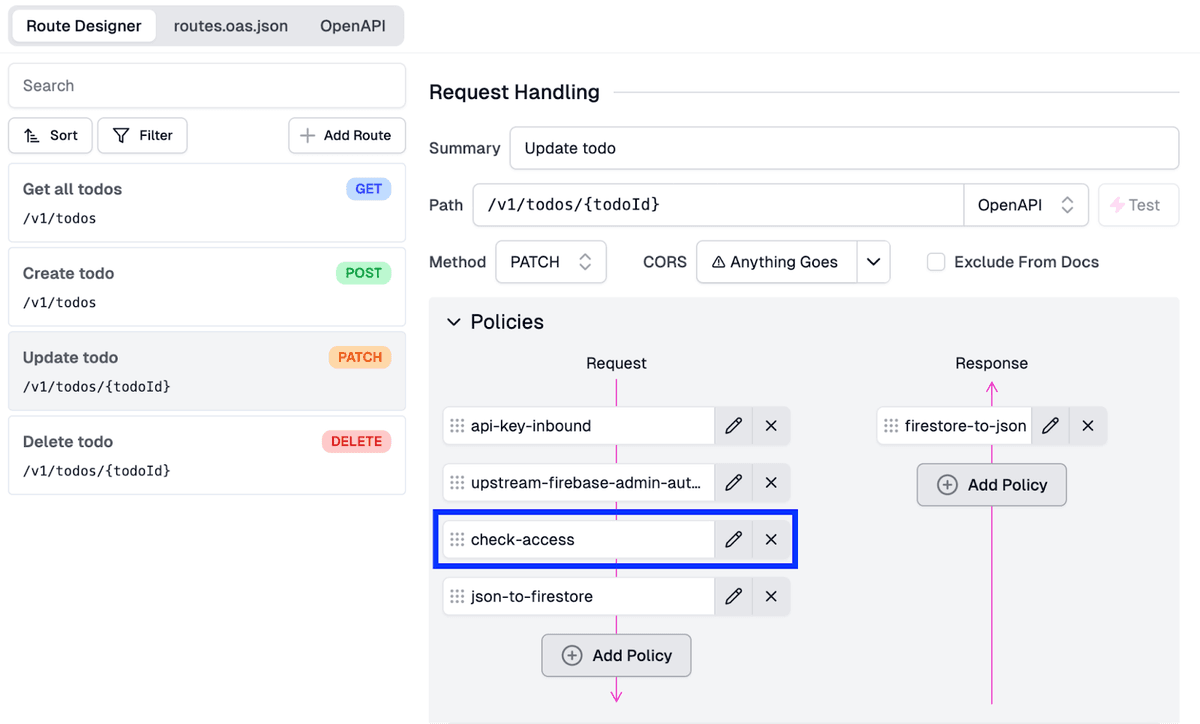
- Move the check-access policy above the json-to-firestore policy in the request pipeline.
- Click Save in the screen’s bottom-left corner to save the configuration and push it out to the gateway.
Next, we must apply this new policy to our DELETE endpoint. For this, we will:
- In the routes.oas.json file, select the DELETE endpoint.
- Within the Policies section, click Add Policy under Request.
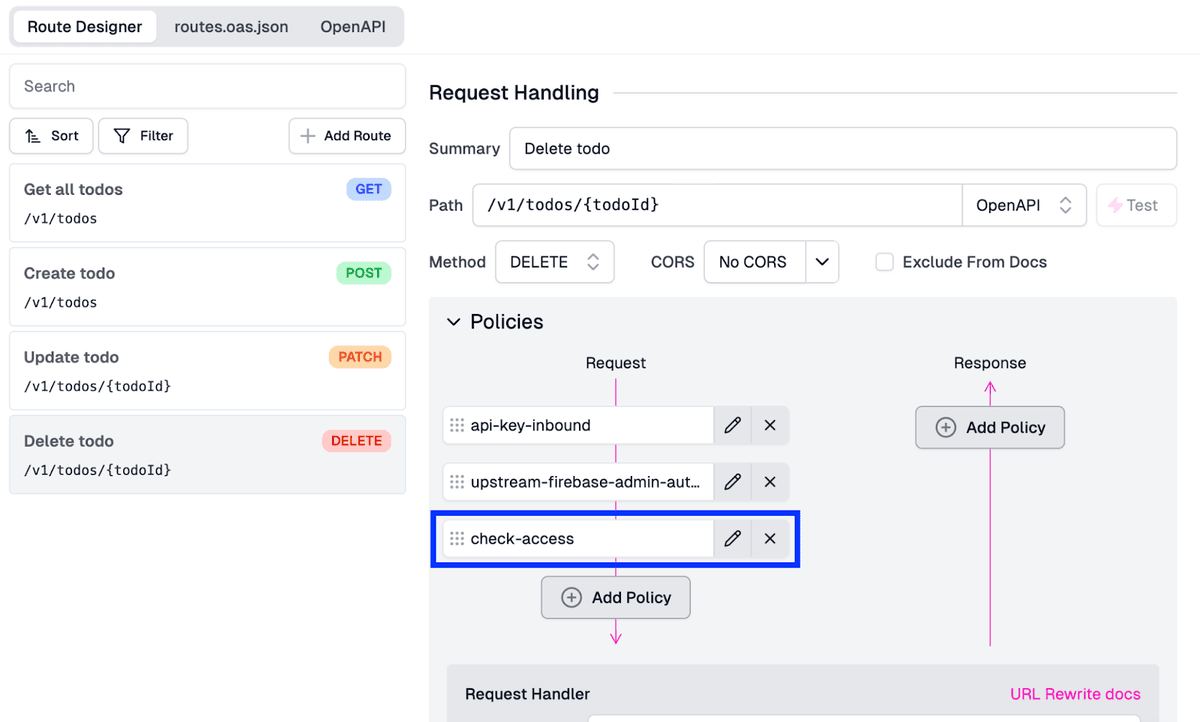
- In the Choose Policy modal**, under Existing Policies, select the **check-access** policy.
This will add the check-access policy to the DELETE endpoint’s request pipeline, ensuring that users can only delete items that they created.
Lastly, click Save in the screen’s bottom-left corner to save the latest configuration and push it out to the gateway.
Step 6: Test Out The Configuration
Now that we’ve got our API key logic for authentication and authorization, it makes sense to test our various scenarios to ensure they all work correctly. The easiest way to do this is:
- Edit an entry in Firestore so that the todo items userId does not match the API Key for the user you’ll send a request for.
- Attempt to UPDATE and DELETE the item through the corresponding endpoints. These requests should fail.
- Create a new item through the POST endpoint, then attempt to UPDATE and DELETE the to-do item. Since you have access, these requests should work.
Conclusion
With that, we’ve done it! We’ve secured our APIs using Zuplo to add API key authentication and authorization. In minutes we’ve secured our APIs to ensure that users can only access and change data that they have created, ensuring the underlying data is secure.
In the following parts of this series, we will build on these APIs and add the following functionalities:
-
Day 3: Add validation for requests.
-
Day 4: Generate developer documentation.
-
Day 5: Monetize the API and add AI features.
Keep following for more detailed step-by-step tutorials and enhancements throughout Firebase week!